[클라우드]Controlplane 가상머신에 SSH 접속 / kubectl
c:\k8s\vagrant-kubeadm-kubernetes> vagrant up
c:\k8s\vagrant-kubeadm-kubernetes> vagrant ssh controlpane : Vagrantfile 이 있는곳에서만 가능
(Vagrantfile : c:\k8s> git clone https://github.com/techiescamp/vagrant-kubeadm-kubernetes) 이렇게 받는다.

- eth0: 외부 네트워크 접근
- eth1: 클러스터 내부 통신
- tunl0: 클러스터 네트워킹 솔루션을 위한 오버레이 네트워크
c:\User> ssh vagrant@10.0.0.10

vagrant : 계정명

10.0.0.10 : 호스트 주소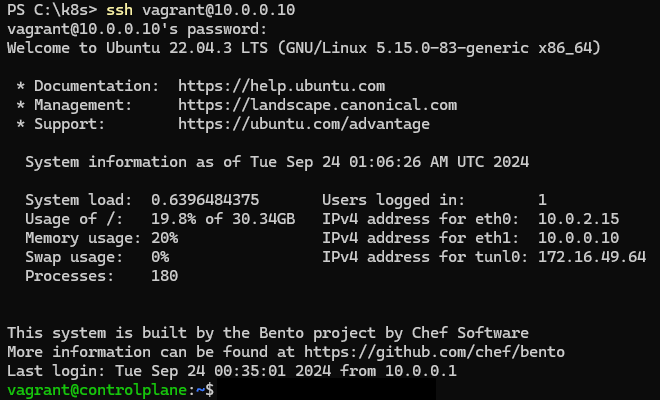
#3 SSH Client (위에처럼 해도되고 프로그램이용해도괜춘)
Bitvise SSH Client Download | Bitvise
Download Bitvise SSH Client The link is to Amazon CloudFront and should be very reliable. If it does not work, try alternative. If the installer downloads but does not start, check below. Our installers are cryptographically signed. Our most recent inst
bitvise.com
접속했으면 사용해보자
kubectl
쿠버네티스 클러스터를 관리하는 명령행 도구(CLI)
로컬환경, 매니지드 환경 모두 사용 가능
쿠버네티스 자원을 생성, 업데이트, 삭제(create, update, delete)
디버그, 모니터링, 트러블 슈팅(log, exec, cp, top, attach, ...)
클러스터관리(top, drain, taint, ...)
설치 ⇒ https://kubernetes.io/docs/tasks/tools/install-kubectl-windows/
사용법 ⇒ https://kubernetes.io/docs/reference/kubectl/
따로설치 할꺼면 위에서 설치를 하면된다.
하지만 기존에 (Vagrantfile : c:\k8s> git clone https://github.com/techiescamp/vagrant-kubeadm-kubernetes) 에서 vagrantfile 을 받고 vagrant up 을하였다. 이때 Vagrantfile 에 정의된대로 가상머신이 생성되고 필요한 소프트웨어가 자동설치된다. 그래서 따로 설치 할 필요없이,
vargrant ssh controlplane 으로 접속한 후 바로 kubectl 명령어를 사용할 수 있다.
kubectl [command] [type] [name] [flags]
- command : 하나이상의 리소스를 조작하기위한 명령어
- type : 리소스타입 (대소문자 구분, 단수, 복수, 단축형으로 사용 가능)
- name : 리소스 이름(생략하면 모든 리소스)
- flags : 부가적으로 설정하는 옵션
*어렵거나 세부옵션은 kubectl get --help : 헬프옵션이용하자
ex )
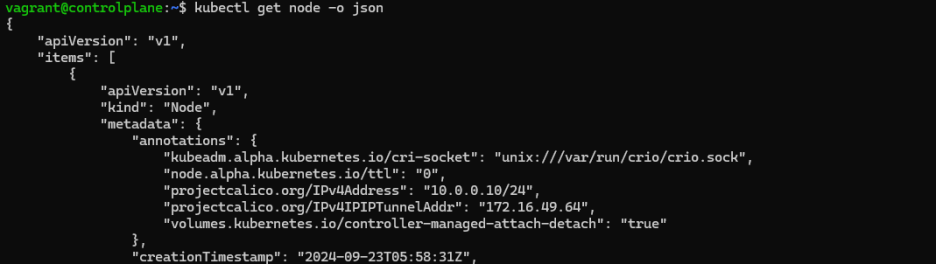
vagrant@controlplane:~$ kubectl get node ⇐ 단수
vagrant@controlplane:~$ kubectl get nodes ⇐ 복수
vagrant@controlplane:~$ kubectl get no ⇐ 축약(단축)
vagrant@controlplane:~$ kubectl api-resources : 사용가능한 모든 리소스목록 표시
중요리소스 축약하기
NAME SHORTNAMES APIVERSION NAMESPACED KIND
configmaps cm v1 true ConfigMap
namespaces ns v1 false Namespace
nodes no v1 false Node
persistentvolumeclaims pvc v1 true PersistentVolumeClaim
persistentvolumes pv v1 false PersistentVolume
pods po v1 true Pod
secrets v1 true Secret
serviceaccounts sa v1 true ServiceAccount
services svc v1 true Service
daemonsets ds apps/v1 true DaemonSet
deployments deploy apps/v1 true Deployment
replicasets rs apps/v1 true ReplicaSet
statefulsets sts apps/v1 true StatefulSet
cronjobs cj batch/v1 true CronJob
jobs batch/v1 true Job
ingresses ing networking.k8s.io/v1 true Ingress


Install and Set Up kubectl on Windows
Before you begin You must use a kubectl version that is within one minor version difference of your cluster. For example, a v1.31 client can communicate with v1.30, v1.31, and v1.32 control planes. Using the latest compatible version of kubectl helps avoid
kubernetes.io
Command line tool (kubectl)
Kubernetes provides a command line tool for communicating with a Kubernetes cluster's control plane, using the Kubernetes API. This tool is named kubectl. For configuration, kubectl looks for a file named config in the $HOME/.kube directory. You can specif
kubernetes.io
Install and Set Up kubectl on Windows
Before you begin You must use a kubectl version that is within one minor version difference of your cluster. For example, a v1.31 client can communicate with v1.30, v1.31, and v1.32 control planes. Using the latest compatible version of kubectl helps avoid
kubernetes.io